

Minecraft Servers can be hard and confusing and can completely change depending on what your using it for.
That’s why I’m making this guide to explain and take you through creating a PaperMC Minecraft Server designed for 1- 20 players.
Downloads are in requirements section!
Paper, Spigot, Bukkit, BungeeCord and Vanilla
Each of the server types above (and below) were, at some point, open-source (except for Vanilla – that comes from Mojang).
Bukkit
Bukkit is an API (Application Programming Interface) which provides third party developers with the ability to add their own code to Minecraft through the use of plugins. This has completely changed how Minecraft servers are managed and has exponentially expanded their capabilities. However, Bukkit is no longer open-source.
Spigot
While a fork of Bukkit, Spigot is an open-source Java project that lets users run their own Minecraft server and add plugins to extend the possibilities of their server. There are over 100,000 Spigot servers in existence today. This makes Spigot one of the most stable and diverse Minecraft servers available.
PaperMC
Paper is the current standard for most servers and is a fork of both Bukkit and Spigot. Paper is a high performance fork of the Spigot Minecraft Server that aims to fix gameplay and mechanics inconsistencies as well as to improve performance. Paper contains numerous features, bug fixes, exploit preventions and major performance improvements not found in Spigot.
Vanilla
Vanilla is the plain Minecraft Server provided by Mojang. While it has features and bug fixes of its own, it isn’t performance optimised or capable of plugins (you, won’t want to use this).
Bungee Cord
Bungee Cord is a proxy server designed to house multiple servers running in conjunction. Like many servers like Hypixel and Mineplex, Bungee allows the load of thousands of players to spread across multiple servers and machines. Sometimes called the Bungee Cord network, Bungee Cord is a unique server type used by thousands of Minecraft server owners. It allows users to easily connect other servers that are running on Spigot or Paper together, creating a network for players to use.
Requirements
Minecraft Servers, especially Java ones, can be very Memory and Compute hungry. My recommended Minimum is listed below and what I use too. You could use an old PC you found in your garage or loft etc, it doesn’t have to meet these requirements! These are mine, and who am I to tell you that you can’t run a server on Windows ME?
- Intel or AMD CPU clocked at Minimum of 3 GHz.
i5-4590 is the model I use. - 3Gb spare RAM. This doesn’t include how much Windows 10 uses. Allow 1Gb at least for Windows 10 to run.
I use around 7Gb RAM. - 40Gb Disk Space – SSD or HDD will make a difference when booting.
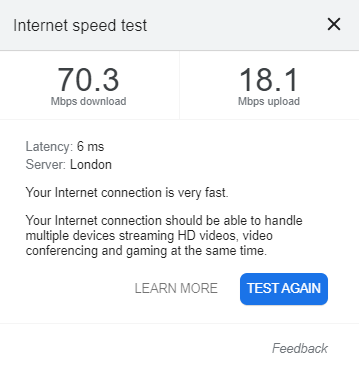
I use a 128Gb Western Digital SSD. - WAN Wired-Ethernet connection with a Minimum of 5Mbit/s upload, 3Mbit/s download. Go to SpeedTest.
Mines a bit overkill, right now a 70Mbit/s Download, 18Mbit/s upload - Preferably a 21st century OS; Ubuntu or server optimised linux (preferable for advanced users), Windows 10 (Server preferable for majority of users), MacOS (Terrible for this Job. Don’t bother. No support at all. I’m sorry 16.54% Mac OSX users!)
- Get Java Here!
- Get PaperMC Here!
You could use an old PC you found in your garage or loft etc, it doesn’t have to meet these requirements. There’s nothing stopping you from running it on an Intel 486, as long as you can run Java! Do take it with a pinch of salt though, because I can’t guarantee the best “lag less experience” (I’m not Bill Gates, you know!).
Server Jar Setup
For the purpose of this server, we are going to use a High Performance PaperMC Minecraft server. Paper usually likes servers to stay updated to the latest versions, and older paper builds are harder to find on their site. Alas, at the time of writing, the latest version is 1.16.5 build #497 dated on the 24 / 02 / 2021 – Here. The versions within the same release should be OK to use, for example right now, 1.16 plugins work fine with 1.16.5. However its always recommended to update everything if you can.
Download the Jar, and put it into your working directory. When you first run it, you won’t see anything much, because it generates an EULA.txt in the folder, and you have to open it and set:
eula=trueThen save. When you launch it again, it’ll open a GUI and do some stuff. Let it boot and generate the world. It might crash though, this is because it only allocates 500Mb RAM to itself. Minecraft Servers need at least 2Gb RAM to run playable, and if you don’t have at least 2 spare in your system, you’ll need some. We can fix this with a
launch.batfile. Launch batch files specify how to launch the Jar file and with how much memory. To create a .bat, first right click folder explorer or desktop, hover over New, Text Document. Rename it to “launch.bat”. Right click it, and click Edit. My launch bat contains this line of code:
java -Xmx6144M -Xms6144M -jar paper-1.16.5-483.jar noguiThis code will launch Java with 6144 Megabytes of RAM without a GUI.
You can use this, but make sure to change the 6144 on -Xmx to the maximum RAM you want to launch with, and -Xms to the minimum (if java crashes trying to launch, try setting them to the same amount). Multiply how much in Gigabytes you want to use by 1024 and you should get the exact Megabyte equivalent.
IE: I want to launch with 4Gb RAM, so I multiply 4 by 1024:
4 * 1024 = 4096
java -Xmx4096M -Xms4096M -jar paper-1.16.5-483.jar noguiAlso, don’t forget to change “paper-1.16.5-483.jar” to the name of your Server Jar, and make sure the launch.bat is in the same folder as the jar.
Once set, double click the launch.bat, and a command prompt should pop up and start the server. If you want a GUI (keep 200Mb spare it takes up a spare amount) delete the “nogui” off of the end.
Connecting to the Server
You can open a new command prompt and type in
“ipconfig” without the quotes and find your iPv4 address. This is your local address of your machine within your local network. Log onto your gaming machine and Direct connect to your local iPv4 of your server. If you’re on the same machine, just type in “localhost” or “127.0.0.1” without the quotes.
Once you connect, if you have a decent setup you should have a playable local Minecraft server. If you don’t like how it looks or works, don’t worry! This is merely the tip of the mountain (yes a mountain!). Everything and more you can think of has a setting, and can be tweaked. Everything and anything from Bedrock support, to mods, and even where sheep spawn, can be modified.
Ok, so getting it perfect might take some time, but what if you want to play with friends? Now here comes the fiddly bit.
Port Forwarding
Every router is different. They’re just like OSes, what should be the same place looks completely different. Or sometimes they’re just rubbish. It’s similar with routers. Every router will look different, and this is the place where most people get stuck. If you’re in the UK, it’s most likely you use BT broadband, TalkTalk or Virgin. Even if you don’t, your router will still probably be made by Huawei.
Open a browser and go to your local IP root.
For me, this is 192.168.1.1
It will open up your router’s GUI. If you can, you’ll want to first reserve your server’s IP address, which I can do from the devices section on my router. For privacy I’ve blurred out the personal stuff. Even if it is only local.
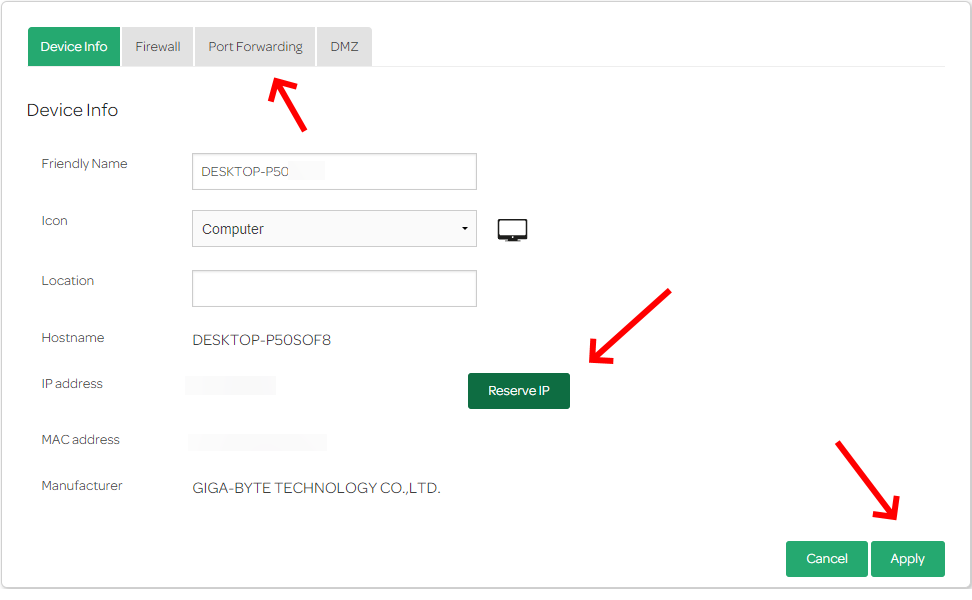
Back at the home page, there’ll either be an advanced section, or a port forwarding section, something of the similar, but we want to port forward from outside our network, on port 25565, to inside your network and your server’s reserved IP. You can see that I’ve pointed this out in the image above.
If you can’t reserve an IP, just make sure you do the next bit, and if your server’s IP changes, you’ll have to change the rule.
Then, add a rule to forward the external 25565 to the internal 25565, with the internal host as your servers IPv4. The External Host is the connecting player, so leave this blank.
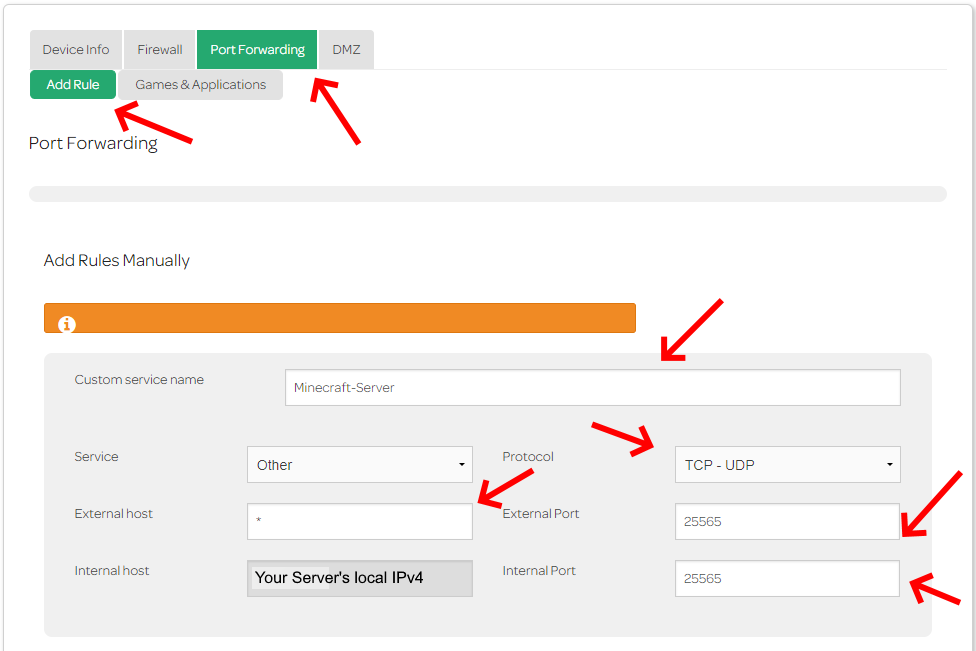
Add an name for your Service, Leave the “Service” type blank or as “Other” as shown above. Make sure the protocol is TCP-UDP. This is important.
Keep in mind I’ve filled this out for the Java edition.
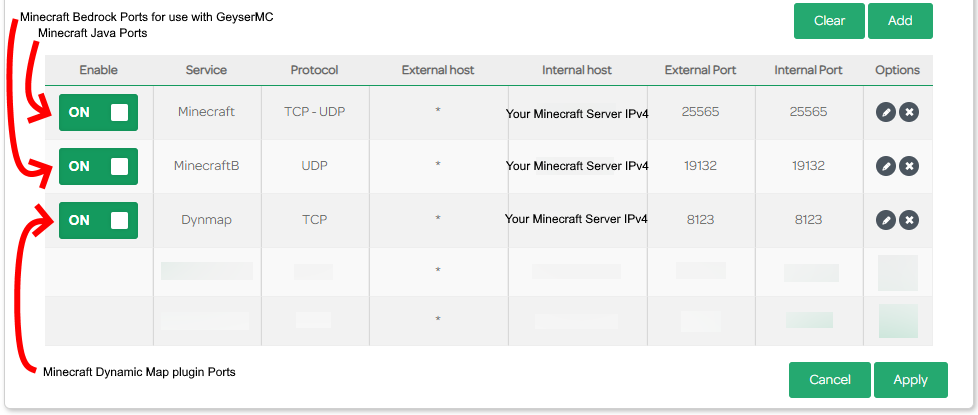
If you want to use the Bedrock-Java GeyserMC proxy, create another rule with the same content but replace both ports with 19132, and change the protocol to UDP only, as this is the Bedrock port and protocol. Save your changes, and make sure they are applied.
Below is an image of each of my rules. I have 3. One for Java, one for Bedrock-Geyser, and one for Dynmap, a dynamic live map plugin hosted on the server. I might get into plugins a bit later in another post, but for now I’ll keep it relatively simple.
Once that is done, on your server search “my ip” in search engine of your choice, and if your server is running, your friends should be able to join with that public IPv4 address.
I hope my first Minecraft Server post was helpful, and in the future I will definitely be posting about how I managed to run my server as a Windows service, and how I got the server to “sleep” while it was not being used. I’ll also create a post purely about some of the plugins I’ve used and how to use them. So stay tuned for that!
Anyway, thanks for spending your time to read this blog, and if your reading from the future, leave a comment, and like a video of mine (It’s really appreciated!)
And by the way, if you ever have any issues about or with this blog or project, or just want to share your results from it, create a thread in the website Forum. Thanks!
Minecraft Server Setup Guide – Server Guide #1
Minecraft Server Bedrock Support – Server Guide #2
Minecraft Sleeping Server Program – Server Guide #3
Minecraft Sleeping Server Program – Building from repl.it – Server Guide #3.5
Minecraft Server Windows Service – Server Guide #4
2 thoughts on “Minecraft Server Setup Guide – Server Guide #1”