In evidenza

About

I’m a computer scientist and software developer. From making games with Python to motion capture with Kinect, I love to bodge old forgotten projects in my spare time. Since 2018 I’ve posted some of my more complicated work to YouTube, and some smaller interests are showcased here.

Projects

Most of my projects can be found on my YouTube channel. A few of my videos have picked up a little traction. I’m proud of the few popular ones, and hope to make more in the future. Majority of my site projects can be found on my project list page.

Contact

Feel free to use the social links at the bottom of the sidebar anywhere on d1ddle.com.

Bezier Curves – Can we Draw one With Pygame?

A Bezier curve is a curve defined by three points, a start, an end and one the line curves toward.
But can we programmatically draw one using Pygame? The answer is Yes! And this is what I wrote to do it!
Here is an online version you can interact with: https://replit.com/@d1ddle/Bezier-Curve

And here is the python code. Make sure you have python 3.9 and pygame 2.0.1 + installed:


# BEZIER CURVE SIMULATION WITH PYGAME - https://d1ddle.com #

import pygame, sys

#global variable initialisations.
pygame.init()
pygame.display.set_caption("Bezier Curve - d1ddle")
WIDTH, HEIGHT = 500, 500
if WIDTH - HEIGHT > 0: HEIGHT = WIDTH
else: WIDTH = HEIGHT
screen = pygame.display.set_mode((WIDTH, HEIGHT))
clock = pygame.time.Clock()
font = pygame.font.Font(None, WIDTH//16)

paused = False
done = False
drag = False
coord_show = False
counter = 0
glob_counter = 0

#co-ordinates of first line
P0 = [50 * WIDTH//400, 300* WIDTH//400]
P1 = [200* WIDTH//400, 50* WIDTH//400]
line_1 = P0, P1

#co-ordinates of second line
#P1 = [200, 50] isn't needed since both lines join at a shared point.
P2 = [300* WIDTH//400, 350* WIDTH//400]
line_2 = P1, P2
co_ords = P0, P1, P2


#these look like matrix transformations, but they're actually
#calculations for the X and Y co-ordinates for any point on a curve/ y = mx + c / ax^2 + bx + c.

#this first one uses P(t) = (1-t)*P0 + t*P1
#twice: once for X, once for Y.
#t is the percentage of the length of the line that you request coordinates for.
#so it varies from 0 to 1, gathering and plotting pixels across the screen.
def P(t, line):
    PtX = (1-t)*line[0][0] + t*line[1][0]
    PtY = (1-t)*line[0][1] + t*line[1][1]
    return PtX, PtY

#this is the quadratic part. Unfortunately this is hard
#coded so we can't really have more than one curve on screen at once.
# Qt = (1-t)^2 * P0 + 2*(1-t)*t*P1 + t^2 * P2
def Q(t):
    QtX = ((1-t)**2)*P0[0] + 2*(1-t)*t*P1[0] + (t**2)*P2[0]
    QtY = ((1-t)**2)*P0[1] + 2*(1-t)*t*P1[1] + (t**2)*P2[1]
    return QtX, QtY


#main loop
while not done:
    for event in pygame.event.get():
        if event.type == pygame.QUIT:
            pygame.quit()
            sys.exit()

        elif event.type == pygame.KEYDOWN:
            if event.key == pygame.K_SPACE:
                paused = not paused

            if event.key == pygame.K_TAB:
                coord_show = not coord_show

            if event.key == pygame.K_ESCAPE:
                pygame.quit()
                sys.exit()

        elif event.type == pygame.MOUSEBUTTONDOWN:
            if event.button == 1:
                drag = True
                mouse_x, mouse_y = event.pos

        elif event.type == pygame.MOUSEBUTTONUP:
            if event.button == 1:
                drag = False

        #this whole block checks for mouse click to move the points.
        elif event.type == pygame.MOUSEMOTION:
            if drag:
                mouse_x, mouse_y = event.pos
                if abs(P0[0] - mouse_x) <= WIDTH//20 and abs(P0[1] - mouse_y) <= WIDTH//20:
                    line_1 = [mouse_x, mouse_y], line_1[1]
                    P0 = mouse_x, mouse_y
                if abs(P1[0] - mouse_x) <= WIDTH//20 and abs(P1[1] - mouse_y) <= WIDTH//20:
                    line_1 = line_1[0], [mouse_x, mouse_y]
                    P1 = mouse_x, mouse_y
                    line_2 = [mouse_x, mouse_y], line_2[1]
                if abs(P2[0] - mouse_x) <= WIDTH//20 and abs(P2[1] - mouse_y) <= WIDTH//20:
                    line_2 = line_2[0], [mouse_x, mouse_y]
                    P2 = mouse_x, mouse_y

    #drawing grid
    screen.fill((255,255,255))

    for i in range(0, WIDTH//10):
        pygame.draw.line(screen, (211,211,211), (i*10, WIDTH), (i*10,0))
        pygame.draw.line(screen, (211,211,211), (0, i*10), (HEIGHT, i*10))
    pygame.draw.line(screen, (105,105,105), (WIDTH//2,0), (WIDTH//2, HEIGHT))
    pygame.draw.line(screen, (105,105,105), (0, WIDTH//2), (HEIGHT, WIDTH//2)) 


    #important loop for drawing curved lines.
    for i in range(1, 1000):
        i*=0.001

        #straight line - inefficient. They're drawn above.
##        Pi = (int(P(i, line_1)[0]), int(P(i, line_1)[1]))
##        screen.set_at(Pi, (0,0,0)")
##        
##        Pi2 = (int(P(i, line_2)[0]), int(P(i, line_2)[1]))
##        screen.set_at(Pi2, (0,0,0)")

        #curved quadratic line
        Qi = (int(Q(i)[0]), int(Q(i)[1]))
        screen.set_at(Qi, (0,0,255))

    #calculating red points
    Red = (int(P(counter*0.005, line_1)[0]), int(P(counter*0.005, line_1)[1]))
    Red2 = (int(P(counter*0.005, line_2)[0]), int(P(counter*0.005, line_2)[1]))

    #drawing Blue point
    Qi = (int(Q(counter*0.005)[0]), int(Q(counter*0.005)[1]))
    pygame.draw.circle(screen, (0,0,255), Qi, WIDTH//80)
    
    #efficient way of drawing the black & red line/s
    widt = WIDTH//400
    if widt < 1: widt = 1
    pygame.draw.lines(screen, (0,0,0), False, [(int(P(0, line_1)[0]), int(P(0, line_1)[1])), (int(P(1, line_1)[0]), int(P(1, line_1)[1])), (int(P(1, line_2)[0]), int(P(1, line_2)[1]))] , width = widt)
    pygame.draw.line(screen, (255,0,0), Red, Red2, width = widt)

    #drawing P points & red points
    pygame.draw.circle(screen, (105,105,105), P0, WIDTH//80)
    pygame.draw.circle(screen, (105,105,105), P1, WIDTH//80)
    pygame.draw.circle(screen, (105,105,105), P2, WIDTH//80)
    pygame.draw.circle(screen, (255,0,0), Red2, WIDTH//80)
    pygame.draw.circle(screen, (255,0,0), Red, WIDTH//80)

    #drawing text co-ords. Not enough to make me systematically draw them.
    textsurf = font.render(str((P0[0]-WIDTH//2, (P0[1]-HEIGHT//2)*-1)), False, (105,105,105))
    
    textsurf2 = font.render(str((P1[0]-WIDTH//2, (P1[1]-HEIGHT//2)*-1)), False, (105,105,105))
    
    textsurf3 = font.render(str((P2[0]-WIDTH//2, (P2[1]-HEIGHT//2)*-1)), False, (105,105,105))
    
    textsurf4 = font.render(str((Red[0]-WIDTH//2, (Red[1]-HEIGHT//2)*-1)), False, (255,0,0))
    
    textsurf5 = font.render(str((Red2[0]-WIDTH//2, (Red2[1]-HEIGHT//2)*-1)), False, (255,0,0))
    
    textsurf6 = font.render(str((Qi[0]-WIDTH//2, (Qi[1]-HEIGHT//2)*-1)), False, (0,0,255))

    
    textsurf7 = font.render("TAB toggle coord", False, (50,50,50))
    screen.blit(textsurf7, (WIDTH//2 + 60, WIDTH//4 * 3 + WIDTH//8 - 25))
    textsurf8 = font.render("SPACE to Pause", False, (50,50,50))
    screen.blit(textsurf8, (WIDTH//2 + 60, WIDTH//4 * 3 + WIDTH//8 + WIDTH//80 * 3 - 25))
    textsurf9 = font.render("Scale 1:10", False, (50,50,50))
    screen.blit(textsurf9, (WIDTH//2 + 60, WIDTH//4 * 3 + WIDTH//8 + WIDTH//80 * 6 - 25))

    if coord_show:
        screen.blit(textsurf, (P0))
        screen.blit(textsurf2, (P1))
        screen.blit(textsurf3, (P2))
        screen.blit(textsurf4, (Red))
        screen.blit(textsurf5, (Red2))
        screen.blit(textsurf6, (Qi))
    else:
        screen.blit(textsurf, (0, 0))
        screen.blit(textsurf2, (0, WIDTH // 16))
        screen.blit(textsurf3, (0, WIDTH // 8))
        screen.blit(textsurf4, (0, WIDTH // 5.3))
        screen.blit(textsurf5, (0, WIDTH // 4))
        screen.blit(textsurf6, (0, WIDTH // 3.2))
    
    #counter and update.
    if counter > 199:
        counter = -1
    if not paused:
        counter += 1

    pygame.display.set_caption("Bezier Curve - d1ddle - Speed: " + str(int(clock.get_fps())))

    glob_counter += 1
    pygame.display.flip()
    clock.tick(60)

Use BBCSDL2 with BeebMid

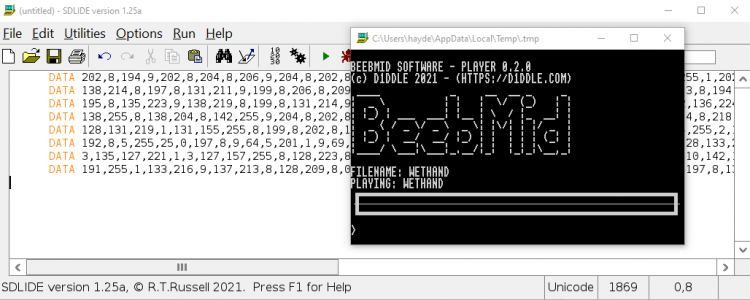
Follow up to https://d1ddle.com/2021/10/08/beebmid-8-bit-midi-player-for-the-bbc-micro/

BBC SDL2

https://www.bbcbasic.co.uk/bbcsdl/index.html

Copy the player program as normal to IDE.
Save it as a .bbc in the root folder (where the exe is located)
Name it as BEEBMID.bbc
Next, get the DATA from the python script
Paste into the SDLIDE and rename all (D. commands to DATA commands)
Then run it.
Inside the shell, type in:
A=OPENOUT”DATA”
REPEAT:READ D%:PRINT# A,D%:UNTIL FALSE
CLOSE# 0
Then type into the shell:
CH.”BEEBMID”
Then type in DATA
BOOOOM!!!!!

BeebMid – 8 bit midi player for the BBC Micro

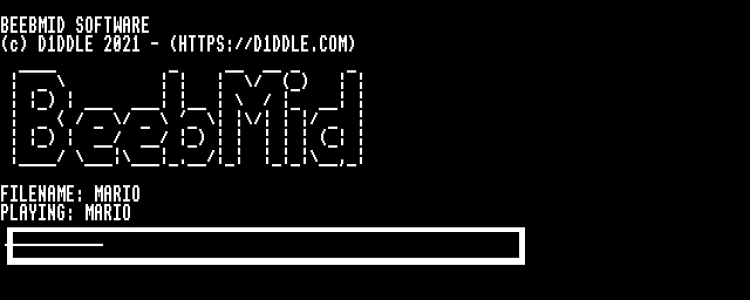
A set of programs to Convert, Save and Play MIDI tracks on the BBC Micro.

https://github.com/d1ddle/BeebMid

Usage:

py -2 beebmidv2.py --player

Will bring up the player code. This can be entered and saved on the BBC as a program. Instructions about this can be found here:

https://github.com/d1ddle/BBCMicro-SaveNLoad/wiki/2—Loading-&-Saving-a-Program

Then use:

py -2 beebmidv2.py --data "midi_track.mid"

To process the midi data code. This can be copied and executed on the Micro, and it’ll save itself. But make sure to edit the name of the file from “Data” to something else.

Then you can chain the player you saved first, then enter the name of your data file you saved.
Then, once you’re bored of that song, you can delete it, then re-process & save a new midi track, (without re-processing the player) saving disk space and increasing the maximum amount of tracks on a disk, since with midi-beeper you could only have 1 track per disk.

Using BeebMid with BBCSDL2

Blackout – my first full game

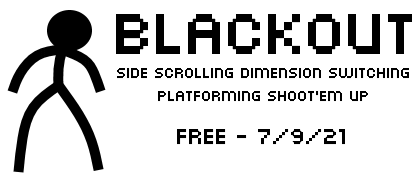
Blackout is a side scrolling, dimension swapping, platforming shoot’em up written in python with pygame. It’s my first game and packs a ton of features including a trailer,  high scores screen, title menu, level editor and so much more!

Still in Beta! Level editor in Alpha!

Currently supporting a Windows build. Works in Linux/Mac using Wine.

Python Physics Simulation

Create a ball-rolling interactive physics simulation in python 3.6+ with pyglet + pymunk!

I don’t have much reason to create a whole in-depth tutorial about this, but I can link a great series of YouTube videos by AtiByte which showed me how to do this.

I’ve uploaded the source code below, as well as a compiled executable of my python script, which of both you can download and run below. Unzip with 7zip or WinRAR.

You’ll have to install pyglet and pymunk to run the source:

pip install pyglet
pip install pymunk

SOURCE:

EXECUTABLE:
https://www.mediafire.com/file/rbifv3y2abqjhpb/pyglet-physics-simulation-no-music.7z/file

Anyway, thanks for spending your time to read this blog, and if your reading from the future, leave a comment, and like a video of mine (It’s really appreciated!)

And by the way, if you ever have any issues about or with this blog or project, or just want to share your results from it, create a thread in the website Forum. Thanks!

BBC Micro Image Converter

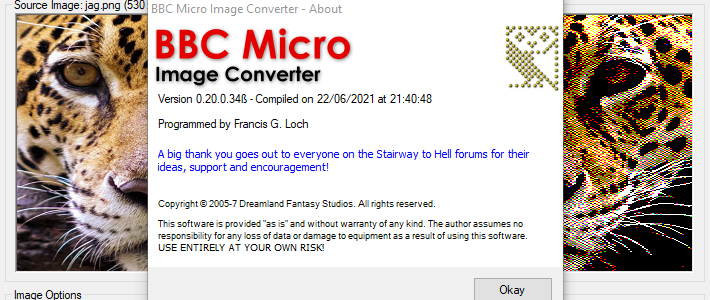
Convert PNG, BMP, JPEG, JPG to BBC Micro screen dumps.
This is a file mirror due to the original site’s links broken, and no current mirrors.
I don’t even know how I found it myself, but it’s the latest version!
Edit: After some more searching I found it on Archive.org! Doh
So I’ve left my mirrors as alternatives and put in the archive.org one.

Edit: 2023: Also found it in this long general list of programs for BBC Micro and Acorn related dev:
https://github.com/simondotm/stardot-wiki/wiki/BBC-Micro-Image-Converter

This page is solely for preservation and archival purposes. There is no copyright infringement intended by any means. All credit for the below software go to Dreamland Fantasy Studios – 2007

BBC Micro Image Converter
v0.20 – (c) 2007 Dreamland Fantasy Studios

Direct Download (0.20), (Archive.org):
https://web.archive.org/web/20201014110639/https://www.dfstudios.co.uk/download/35269/

Original Webpage (Archive.org)
https://web.archive.org/web/20210304041929/https://www.dfstudios.co.uk/software/bbc-micro-image-converter/

ALTERNATIVELY:

.7z (7-zip – extract with WinRAR):

OR
https://download1486.mediafire.com/4s8lh77jyirg/s3zikvsmpuxzi72/BBC+Micro+Image+Converter.exe
OR
https://www.mediafire.com/file/s3zikvsmpuxzi72/BBC_Micro_Image_Converter.exe/file

“Six the musical – Ex Wives cover”

Hi, quick note,
I edited this video for a friend of mine, and it has just been released!
I’d really appreciate if you checked it out because it took a LONG time to produce!
Here’s the link to the page on her website!
https://tegangrace.com/2021/02/28/six-the-musical-ex-wives-cover/
Thanks!

By the way, I was stuck editing this on my laptop, so apologies for the poor Chroma Key effects. It’s only an amateur production.